Double Gauze Napkins With Mitered Corners - Sewing Techniques I Wish I Knew Sooner

Sewing with double gauze can be challenging , but I recently made 25 double gauze napkins with mitered corners and I've made a video tutorial sharing tips and best practices working with this soft fabric.
Tips for Sewing with Double Gauze and Creating Mitered Corners
Double gauze is a wonderfully soft fabric, but its loosely woven nature requires some adjustments. Here are some tips to help you create beautiful mitered corners with double gauze:
Preparation
- Pre-wash Fabric: Double gauze tends to shrink, so pre-wash your fabric to avoid size issues later.
- Check Your Sewing Needle: Ensure your needle is sharp. Run it over your nail—if it snags, replace it. If you hear a thumping sound when sewingor see the tip missing, also replace it.
- Prepare Extra Bobbins: If you are batch sewing like me, have extra bobbins ready to avoid interruptions.
Cutting
- Straighten the Edges: Press and straighten the fabric before cutting. Pull a thread to ensure you are working with a straight edge and you are working on grain.
- Mark Sections Before Cutting: Measure and mark all sections before cutting. This ensures accuracy and helps in checking measurements. If you miscalculated, you will come up short for the last napkin.
- Pull a Thread to Cut on Grain: After marking, pull a single thread at each interval to guide your cuts along the grain. Time consuming but worth it on double gauze and linen.
Pressing and Folding
- First Fold: Fold the raw edge by 1 cm (3/8") and lightly press. It's more important to keep the edge straight than to measure exactly 1 cm (3/8")
- Press Without Stretching: Lift and press your iron instead of sliding it to avoid distorting the fabric.
- Use Stitches as Guides: If you can see them utilize the small stitches in the fabric to guide your folding and pressing.
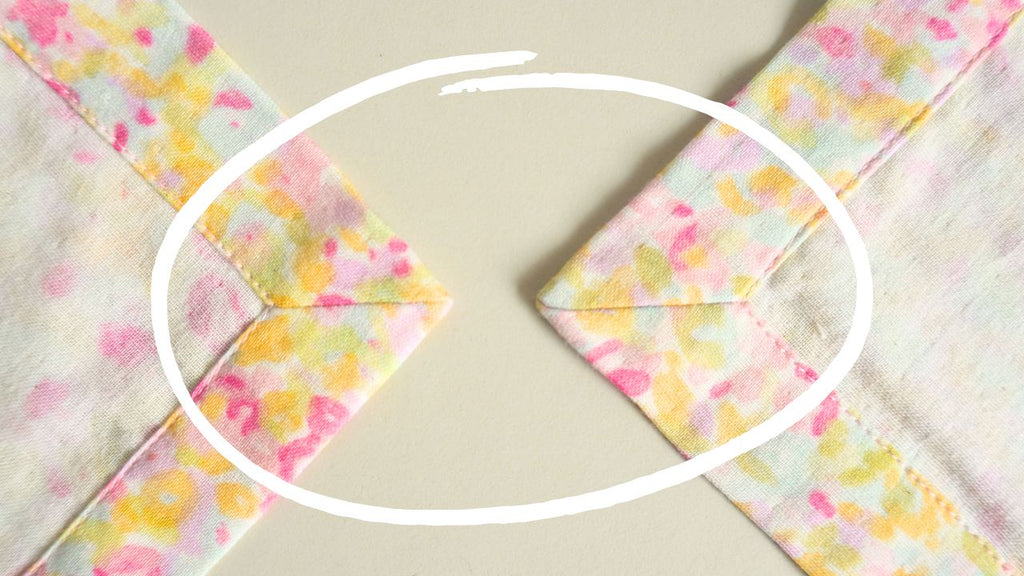
Mitered Corners (these points are best understood watching the video)
- Marking the Corner: Unfold the second fold, leave the first 1 cm fold intact, and mark 5 cm (2 inches) from the corner on each side. Connect these points through the intersection of the creases for a precise line.
- Aligning Edges: Ensure the edges are perfectly aligned before pinning. Pin 5-10 cm (2-4 inches) past the point for better accuracy.
- Sew with Care: Start sewing within a little bit away from the edge, then backstitch to secure. Use tension on thread tails to guide fabric through the machine without pulling.
Final Steps
- Trim and Turn: After sewing, trim the seam allowance to 0.5 cm (1/4 inch), press open the seam using your finger or nail, and turn the corners carefully.
- Final Press: Press the edges again to prepare for topstitching.
- Topstitching: Align the edge of the fabric with the presser foot gap, slow down near corners, and use the hand wheel for precision. Sew over the starting stitches to backstitch and secure the thread.
General Tips
- Take Your Time: Go slow to avoid mistakes, especially with delicate fabrics like double gauze.
- Adjust Techniques: Customize your methods to suit your skill level and preferences.
- Stay Organized: Batch sew and organize your steps to maintain efficiency and accuracy.
I hope that by following these tips, even a beginner can create beautifully sewn double gauze napkins with perfect mitered corners. Happy sewing!